Archivist Reference Guide
Audience: Archivists — people who own and manage a Zeuge family archive.
This guide is a comprehensive reference for every screen, workflow, and feature available to archivists. Use it as a manual — look up the section you need rather than reading front to back.
Table of Contents
- Core Concepts
- Getting Started
- Dashboard
- Archives
- Batches
- Items Tab — Uploading & Managing Photos
- Contributors Tab — Inviting Family Members
- Responses Tab — Reviewing Contributions
- Metadata Tab — Curation & Review
- Visual Similarity Analysis
- Entity Normalization
- Book Tab — Photo Book Export
- Batch Lifecycle & Status
- Settings Page
- Subscription Tiers
- Keyboard Shortcuts
Core Concepts
Archives, Batches, and Items
Zeuge uses a three-level hierarchy to organize content:
Archive
 └─ Batch
└─ Item (photo/document)- An Archive is a top-level container for a family or project (e.g., "The Johnson Family Archive").
- A Batch is a focused collection of photos within an archive (e.g., "Summer Vacations 1970–1985").
- An Item is a single photo or document inside a batch.
Contributors are invited per batch and can only see the items in that batch.
Responses
A Response is a piece of memory contributed by a contributor. It can be:
- Voice — a recorded voice message (transcribed automatically)
- Video — a camera recording (audio extracted and transcribed)
- Text — a typed message
One response can cover multiple items (e.g., "This response covers photos 3, 4, and 5 — they're all from the same event").
Curated Metadata
For each item, Zeuge maintains a curated metadata record with these fields:
| Field | Description |
|---|---|
| Date | When the photo was taken (from contributors' responses) |
| Location | Where it was taken |
| People | Names of people in or mentioned in the photo |
| Tags | Themes, objects, topics (e.g., "beach," "wedding," "graduation") |
| Description | A short factual description |
| Stories | Anecdotes, memories, or narrative context |
Each field has a source (auto = AI-generated, manual = archivist-edited) and auto-generated fields are recalculated when you recompute.
Getting Started
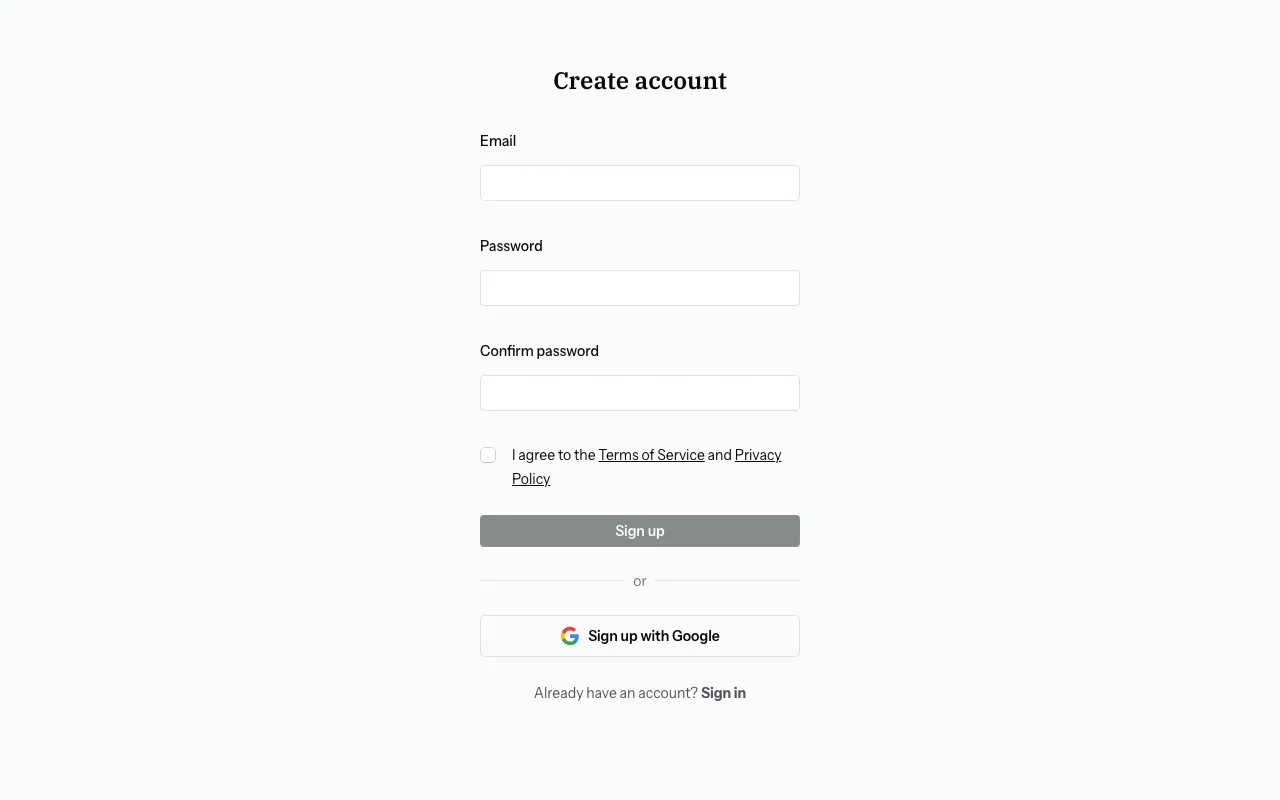
Sign Up
- Go to zeuge.io.
- Click "Sign up".
- Enter your email and create a password, or use "Sign in with Google" for one-click access.
- You'll land on your Dashboard.
Sign In
Return visitors: click "Sign in" on the home page and enter your credentials.
Dashboard
The Dashboard (/dashboard) is your home base. It gives you an at-a-glance view of everything happening across your archives.

Dashboard Sections
Attention Banner
Appears only when there are responses in an error state. Surfaces the problem so you can act quickly — click through to the relevant batch's Responses tab and use "Reprocess."
Getting Started
A checklist card for new accounts that guides you through the first-time setup steps. Disappears once dismissed.
Summary Cards
High-level counts: total archives, total batches, total responses, and total contributors across all your archives.
Recent Activity
A feed of the most recent contributor responses submitted across all batches, and the status of any recent exports.
Active Sessions
Batches with status "Invited" or "Active" — currently open for contributor responses. Each card shows the batch name, archive, status, and a direct link into the batch.
Archives Overview
A summary of each archive: how many batches it contains and their collective response count. Quick-links into each archive.
Archives
Creating an Archive
- Navigate to the Archives page from the sidebar or dashboard.
- Click "New Archive".
- Enter a name and optional description.
- Click "Create".
Archive Limits
The number of archives you can create depends on your plan:
| Plan | Archives |
|---|---|
| Free | 1 |
| Small | 5 |
| Medium | 20 |
| Large | Unlimited |
Editing & Deleting Archives
- Edit: Click the archive name on the archives list to rename it or update the description.
- Delete: Available from the archive settings. Deleting an archive permanently removes all batches, items, responses, and metadata within it.
Batches
Creating a Batch
- Open your archive.
- Click "New Batch".
- Fill in:
- Title (required)
- Description (optional) — context for yourself
- Prompt (optional) — shown to contributors on their welcome screen
The Batch Detail Page
The batch detail page is where all batch work happens. Navigation uses a progression stepper with five numbered steps:
| Step | Purpose |
|---|---|
| 1 — Items | Upload and manage photos |
| 2 — Contributors | Create and manage contributor invites |
| 3 — Responses | Review contributions |
| 4 — Metadata | Curate extracted metadata and export to IPTC/Lightroom |
| 5 — Book | Compose and export a PDF photo book |
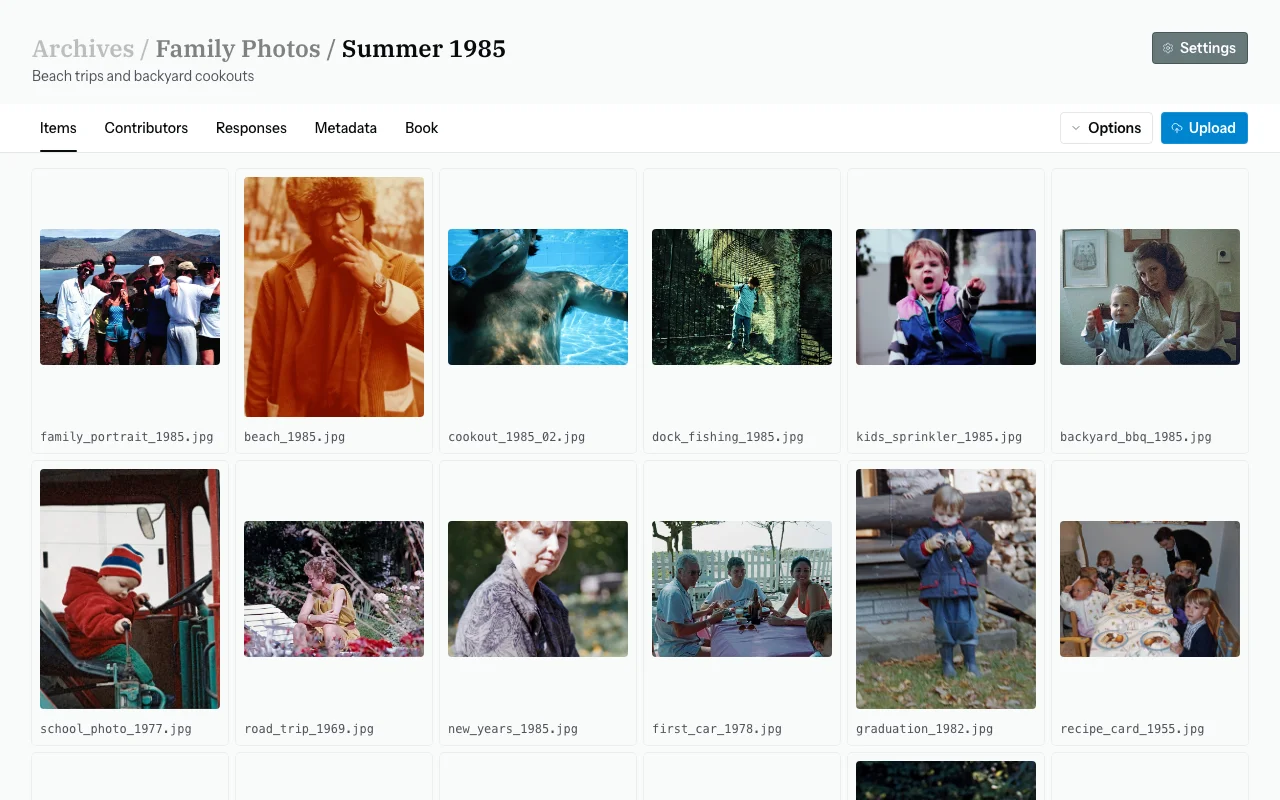
Items Tab
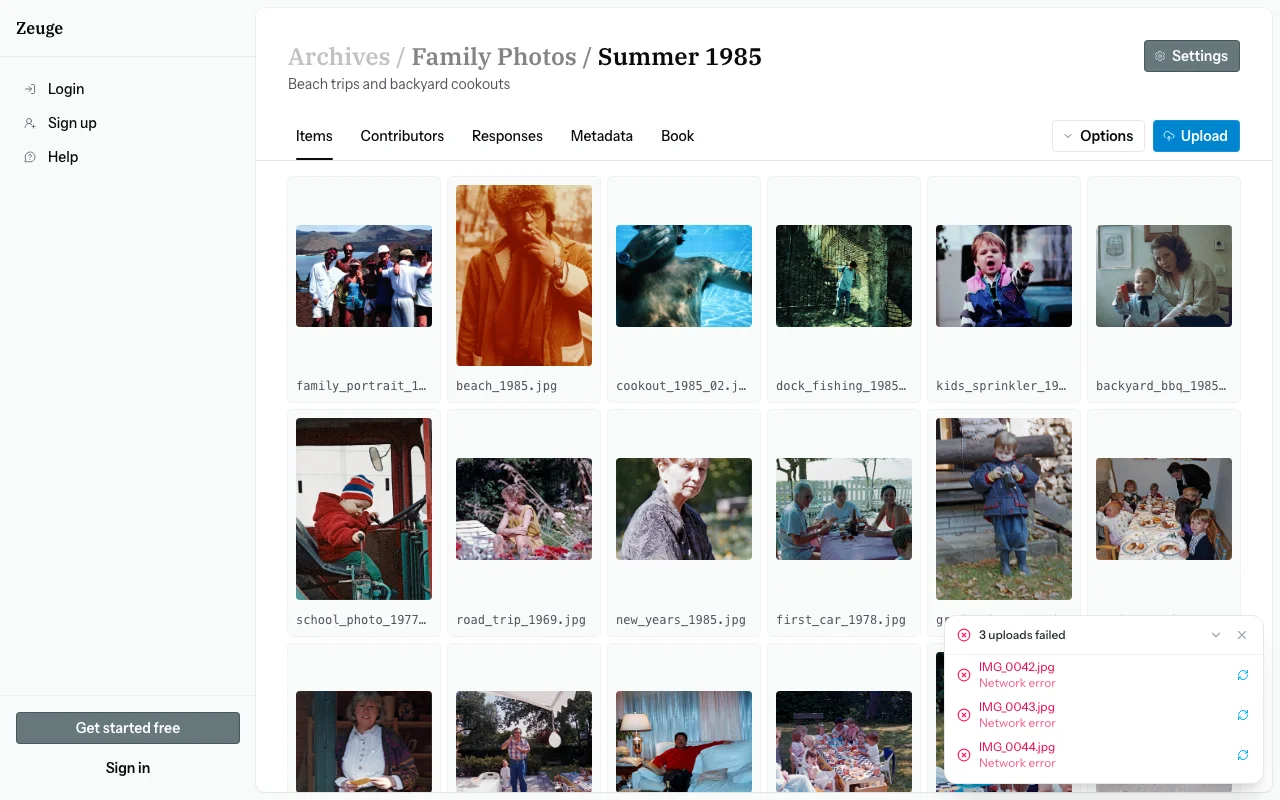
The Items tab lets you upload, view, reorder, and delete photos in your batch.
Uploading
- Drag and drop files or folders directly onto the items area.
- Click to browse and select files from your file system.
- Supported formats: JPEG, PNG, WebP, TIFF, HEIC, and camera RAW (DNG, NEF, CR2, ARW).
- Maximum file size: 50 MB per file.
After upload, Zeuge stores three versions of each image:
- Web copy — max 2400px, optimized for display
- Thumbnail — max 600px, for grids and similarity analysis
- Original — your full-resolution file, preserved as uploaded
EXIF metadata (date, camera model, GPS) is extracted and stored automatically.
Grid Size
Use the Options → Grid size dropdown to switch between Small, Medium, and Large thumbnail sizes. Your preference is saved between sessions.
Reordering Items
Drag items within the grid using the drag handle. The order determines the sequence contributors see in their carousel.
Selecting Items
Click any item to select it. Hold Shift and click to select additional items. A floating selection bar appears at the bottom of the screen showing the count and available bulk actions:
- Rotate CW — rotate all selected items 90° clockwise
- Delete — permanently delete all selected items (a confirmation dialog appears)
Click the × button in the selection bar or click an empty area to deselect.
Item Limits by Plan
| Plan | Items per Batch |
|---|---|
| Free | 50 |
| Small | 300 |
| Medium | 1,000 |
| Large | Unlimited |
Contributors Tab
Adding a Contributor
- Click "Invite first contributor" (or "Invite" if you already have contributors).
- Fill in the dialog:
- Name (required) — the greeting shown to the contributor (e.g., "Dad" or "Aunt Ruth").
- Email (required) — used to de-duplicate invites; no email is sent automatically.
- Relationship (optional) — e.g., "granddaughter," "family friend" — for your reference.
- Expiration date (optional) — the link stops working after this date.
- Click "Add".
A unique invite link is generated — copy it and share it via email, text, or any messaging app.

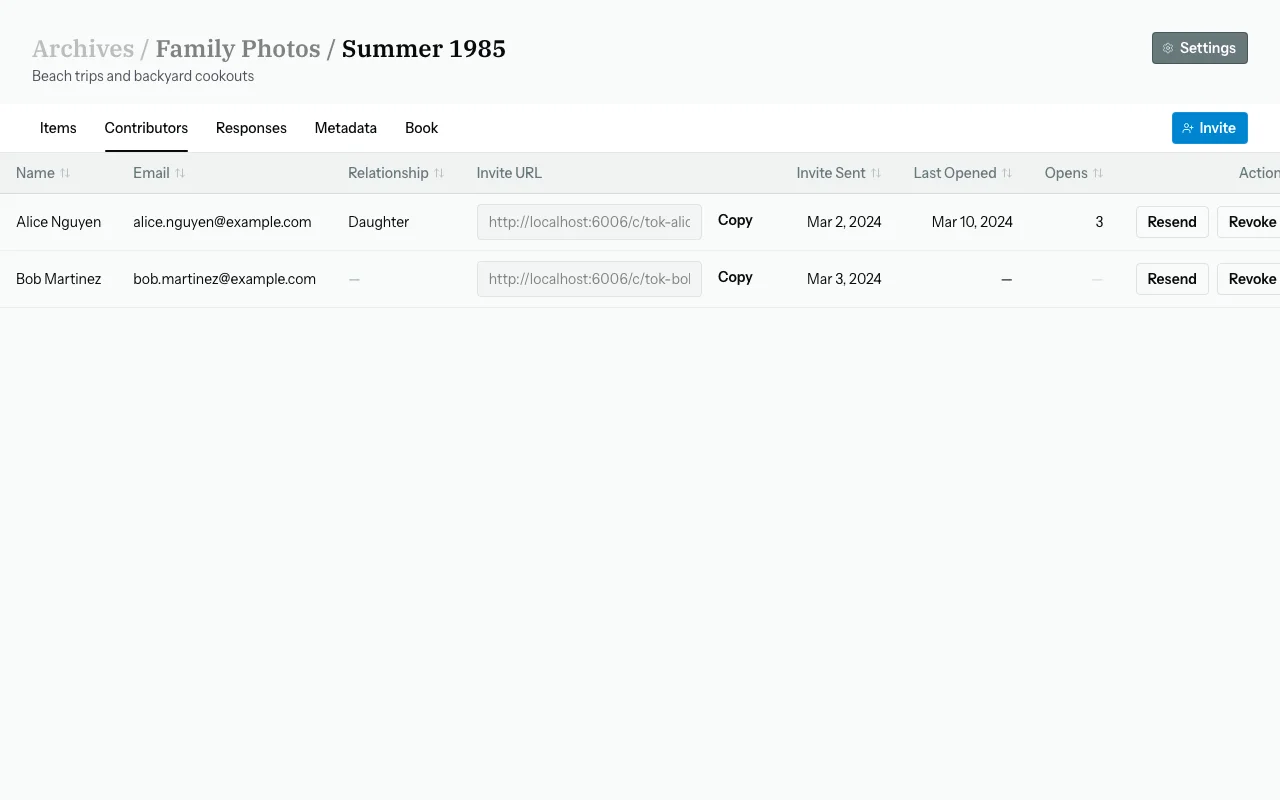
Invite Links
Each invite link is unique per contributor per batch. Do not share the same link with multiple people.
Example link format: https://zeuge.io/c/{unique_token}
Revoking Access
Click "Revoke" on a contributor row to immediately invalidate their link. Their previously submitted responses are preserved.
Saved Contributors
When you add a contributor, Zeuge saves their name and email for quick re-invite on future batches. Look for the "Saved contributors" dropdown when adding a new contributor.

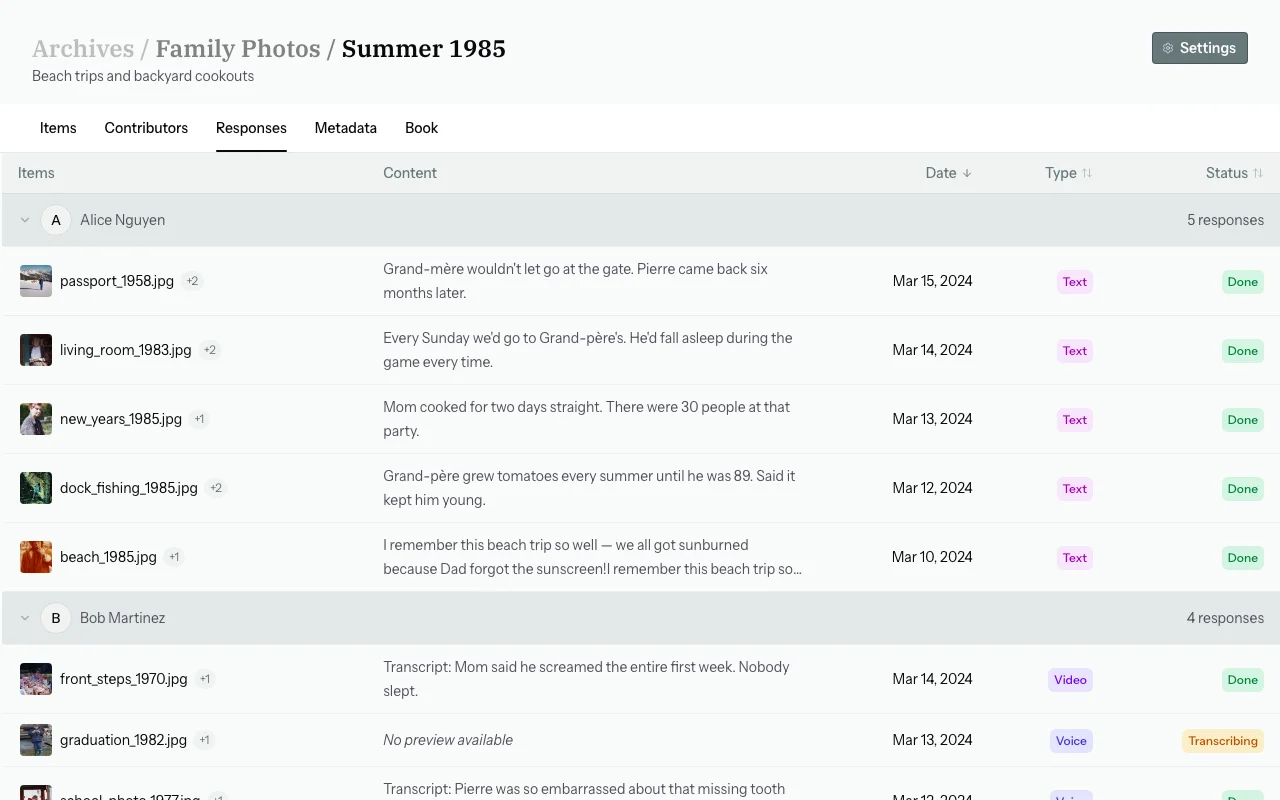
Responses Tab
The Responses tab shows all contributions submitted for the batch as a sortable table grouped by contributor.
Table Columns
| Column | Content |
|---|---|
| Items | Filename of the first covered item + "+N" badge if the response covers multiple items |
| Content | 2-line preview of the transcript or typed text |
| Type | Voice / Video / Text badge |
| Duration | Length of audio/video (voice and video only) |
| Status | Processing status badge |
| Submitted | Date/time |
Click any row to open the response drawer on the right, which shows the full transcript, extracted tags, an audio/video player, and delete/reprocess actions.
Playing Audio / Video
Click a row to open the drawer. Press Space (when the drawer is open and you are not in a text field) to play the audio or video.
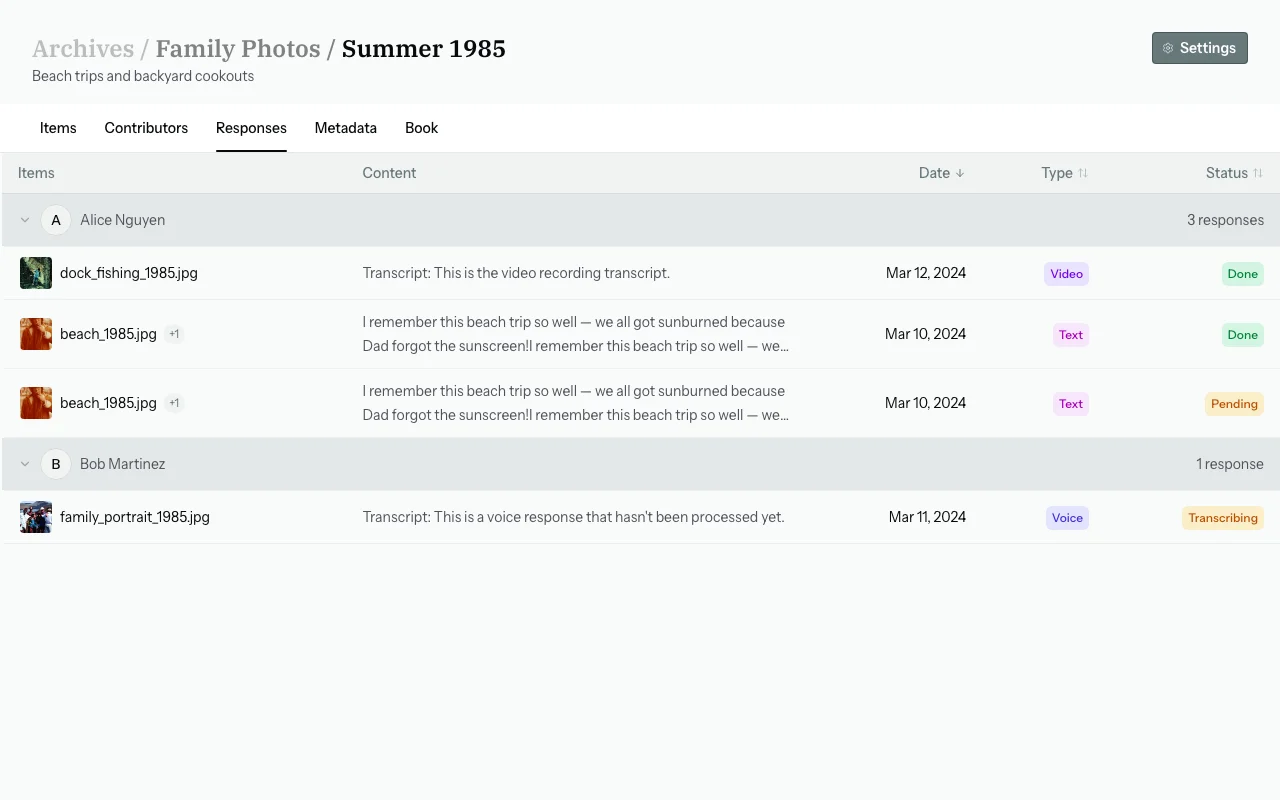
Processing Statuses
| Status | Meaning |
|---|---|
| Pending | Queued, not yet started |
| Transcribing | Speech-to-text in progress |
| Extracting | AI metadata extraction in progress |
| Processing | Final merge into curated metadata |
| Done | Fully processed |
| Error | Failed — available for reprocessing |
Response Actions
Via the ⋮ dropdown on each row (or in the drawer):
- Reprocess — re-run the full transcription + extraction pipeline. Useful after errors or to retry with updated settings.
- Delete — permanently remove the response and its associated metadata.
The Options → Retry all errors nav action lets you reprocess every response in error state in a single click.
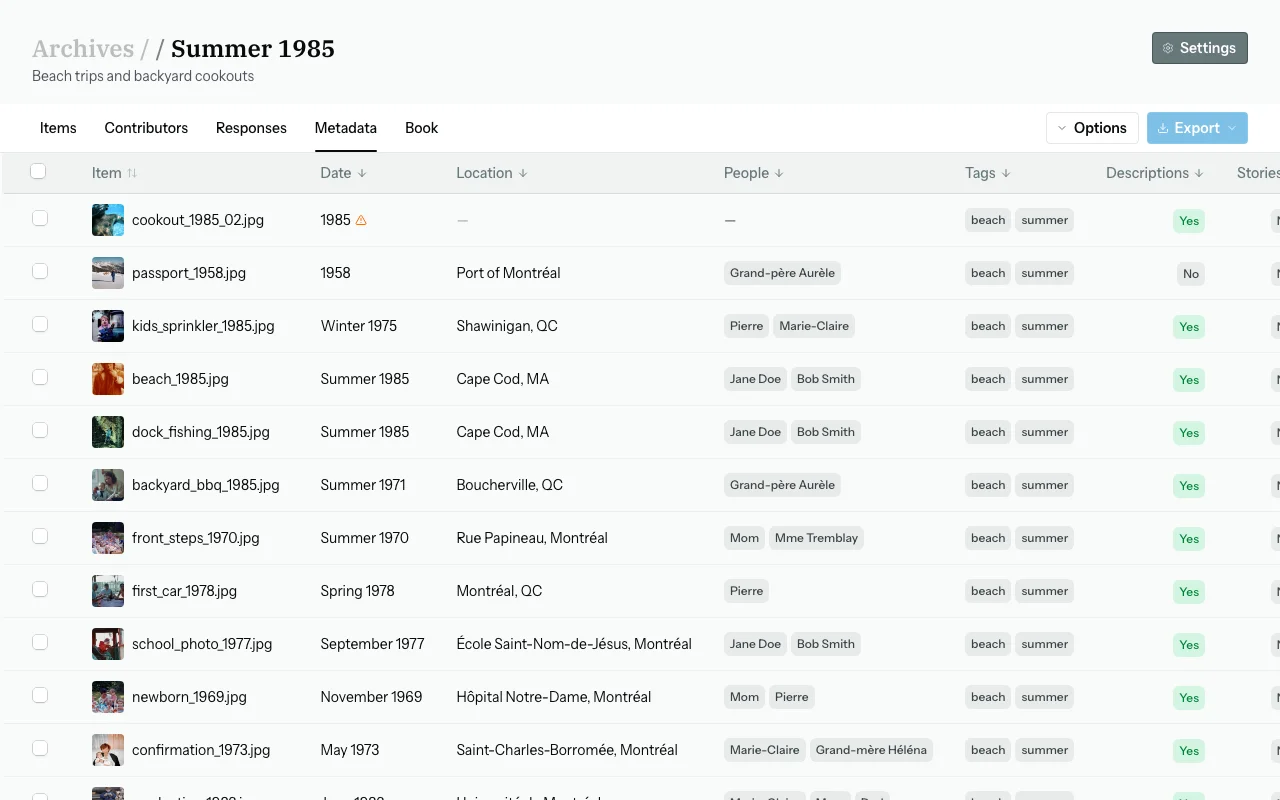
Metadata Tab
The Metadata tab is where you review, correct, and finalize the structured metadata extracted from all contributor responses. It also contains the Export functions for generating IPTC and Lightroom packages.
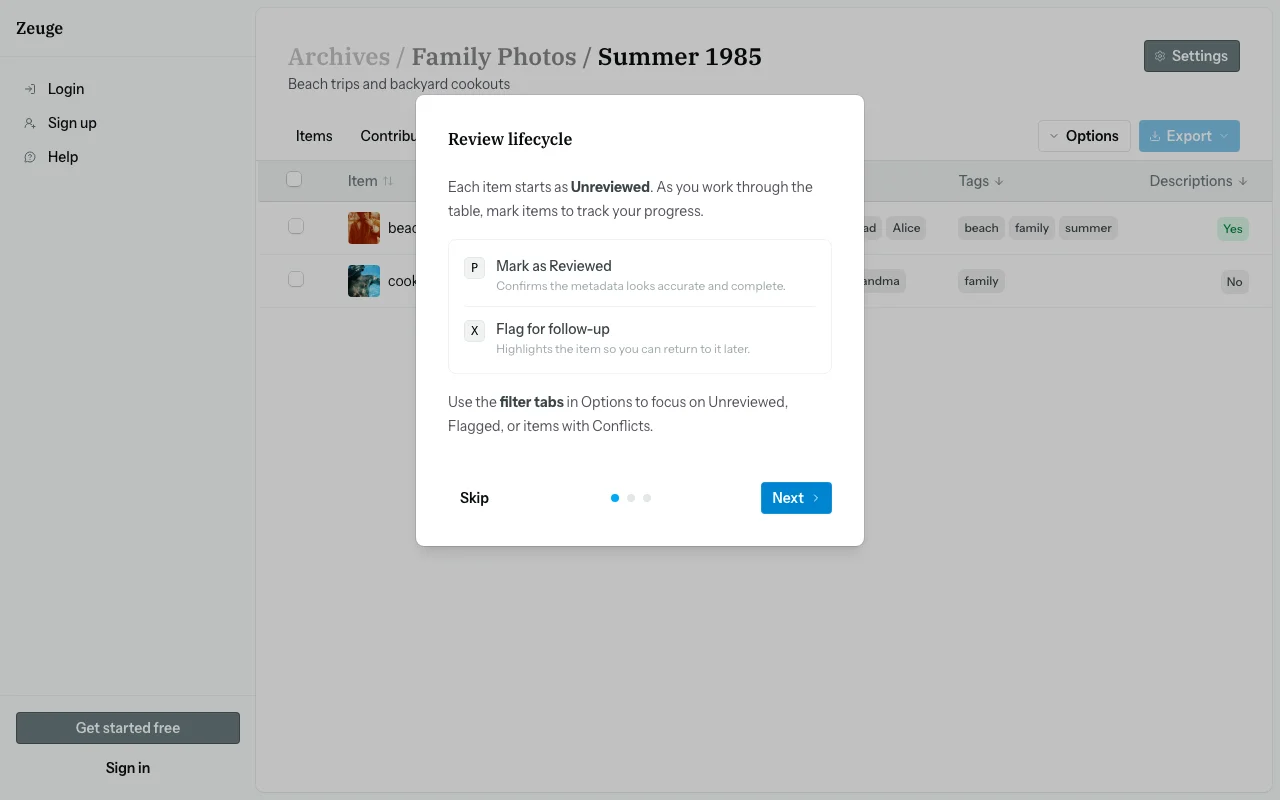
First-Time Setup Dialog
The first time you visit the Metadata tab, a 3-step walkthrough appears automatically:
- Review lifecycle — explains the Unreviewed → Reviewed / Flagged states and keyboard shortcuts
- Curated vs. contributor sources — explains the table, row drawer, and source cards
- Normalization — brief intro to the entity normalization feature
You can re-open this walkthrough at any time via Options → How it works.
Layout
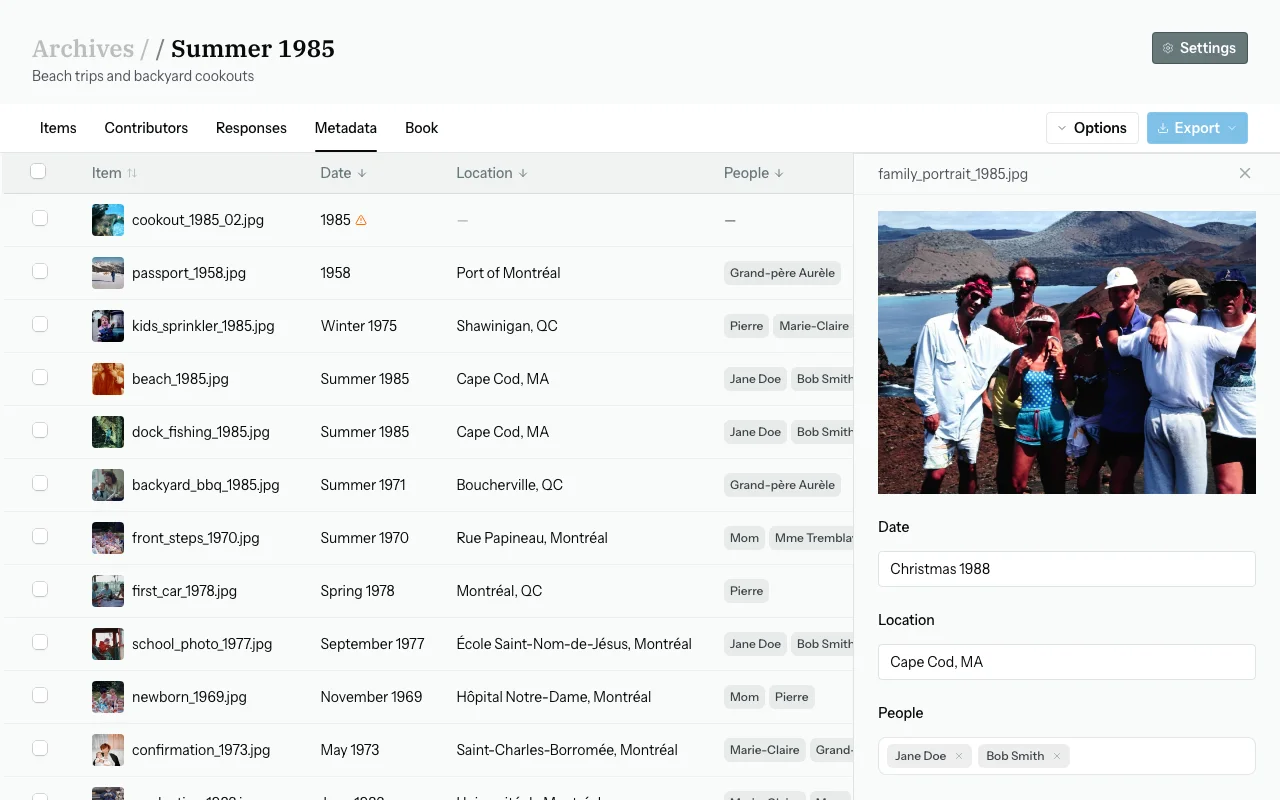
The tab displays a table — one row per item in your batch. Each row shows the item thumbnail, filename, date, location, people, review status, and completeness indicator. Click any row to open the row drawer on the right for full editing.
Filters
| Filter | Shortcut | Shows |
|---|---|---|
| All | Shift+A | Every item |
| Conflicts | Shift+C | Items with conflicting contributor values |
| Incomplete | Shift+I | Items missing date, location, or people |
| Flagged | Shift+F | Items flagged for follow-up |
| Unreviewed | Shift+U | Items not yet marked reviewed |
Curated Metadata Fields
For each item, the row drawer shows six fields: Date, Location, People, Tags, Description, Stories. Each field has:
- Its current curated value — what will appear in your export
- A source badge:
auto(AI-merged from contributor responses) ormanual(you edited it) - Click to edit inline
Contributor Source Cards
Below each field in the drawer you will see source cards — one per contributor who mentioned something about that field. Each card shows the contributor's name and their extracted value. Click Apply to adopt a contributor's value as the curated value.
Sources are suggestions only — they never overwrite automatically.

Editing Fields
Click any field in the row drawer to edit it. For People and Tags, type a name and press Enter to add it as a chip; click × to remove. Click Save — the field becomes manual and will not be overwritten by recompute.
Review Statuses
| Status | Keyboard | Meaning |
|---|---|---|
| Unreviewed | U | Default — not yet checked |
| Reviewed | P | Metadata verified and complete |
| Flagged | X | Needs attention or follow-up |
Navigate rows with ↑ / ↓. Press Esc to close the drawer.
Bulk Actions
Press Space to select/deselect the focused row. A floating bulk action bar appears at the bottom of the screen when one or more rows are selected.
| Action | Keyboard shortcut | What it does |
|---|---|---|
| Date | D | Set a date for all selected items |
| Location | L | Set a location for all selected items |
| Mark Reviewed | — | Mark all selected items as reviewed |
| From EXIF | — | Populate date/location from embedded EXIF data |
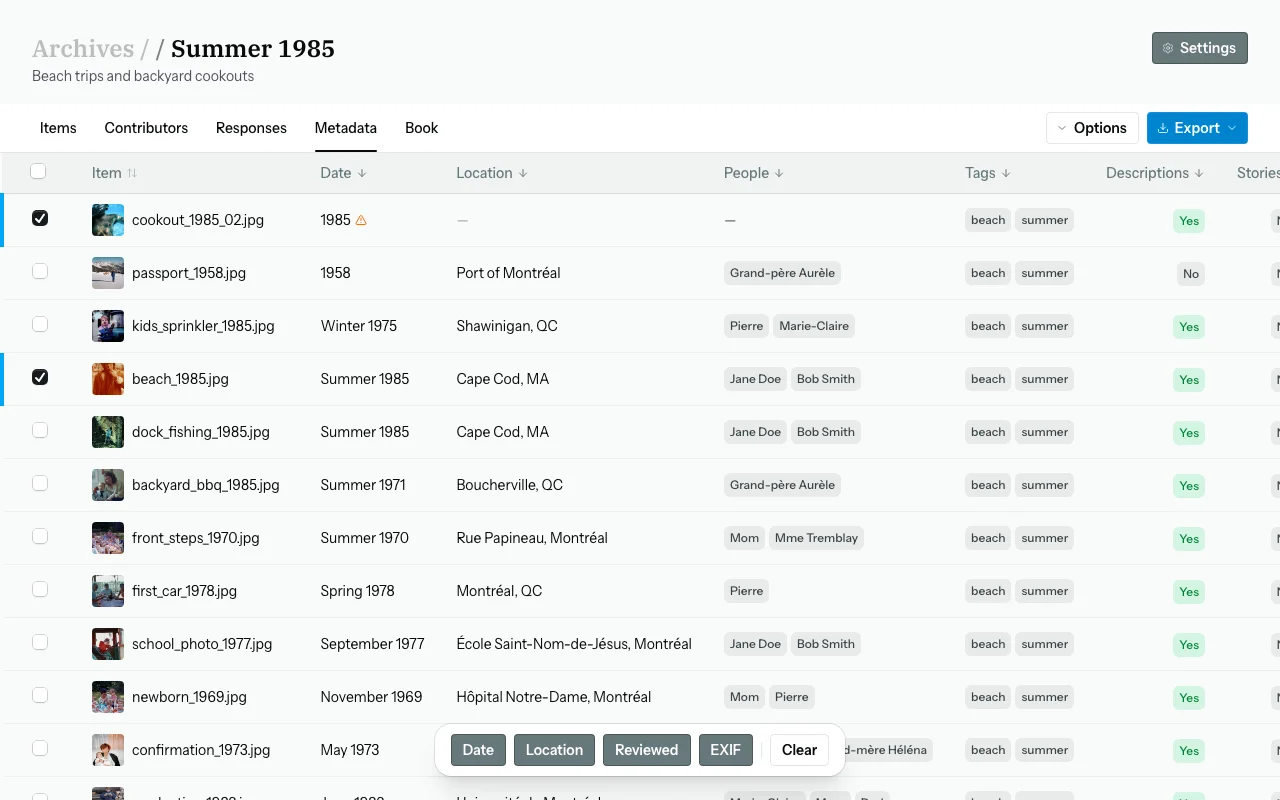
EXIF Columns
Toggle the EXIF date, GPS, and camera model columns on/off with Shift+E or via Options → Show EXIF columns.
Exporting Metadata
The Options → Export section lets you generate:
- IPTC ZIP — a ZIP of all batch photos with embedded IPTC/XMP metadata (date, location, people, description, tags). Compatible with most archival software and photo viewers.
- Lightroom ZIP — a ZIP formatted for direct import into Adobe Lightroom, including XMP sidecar files.

Visual Similarity Analysis
Find near-duplicate or visually similar photos in your batch automatically.
Running Analysis
From the Items tab, open Options → Analyze Similarity. The analysis runs in the background (typically 10–60 seconds depending on batch size). If analysis has already been run, the option shows as "Re-run Analysis".
Reviewing Groups
Proposed groups appear as cards with thumbnail collages. For each group:
- Click "Confirm" — group is linked in the archive and shown to contributors
- Click "Reject" — group is dismissed
- Click "View" — see all items in the group at larger size
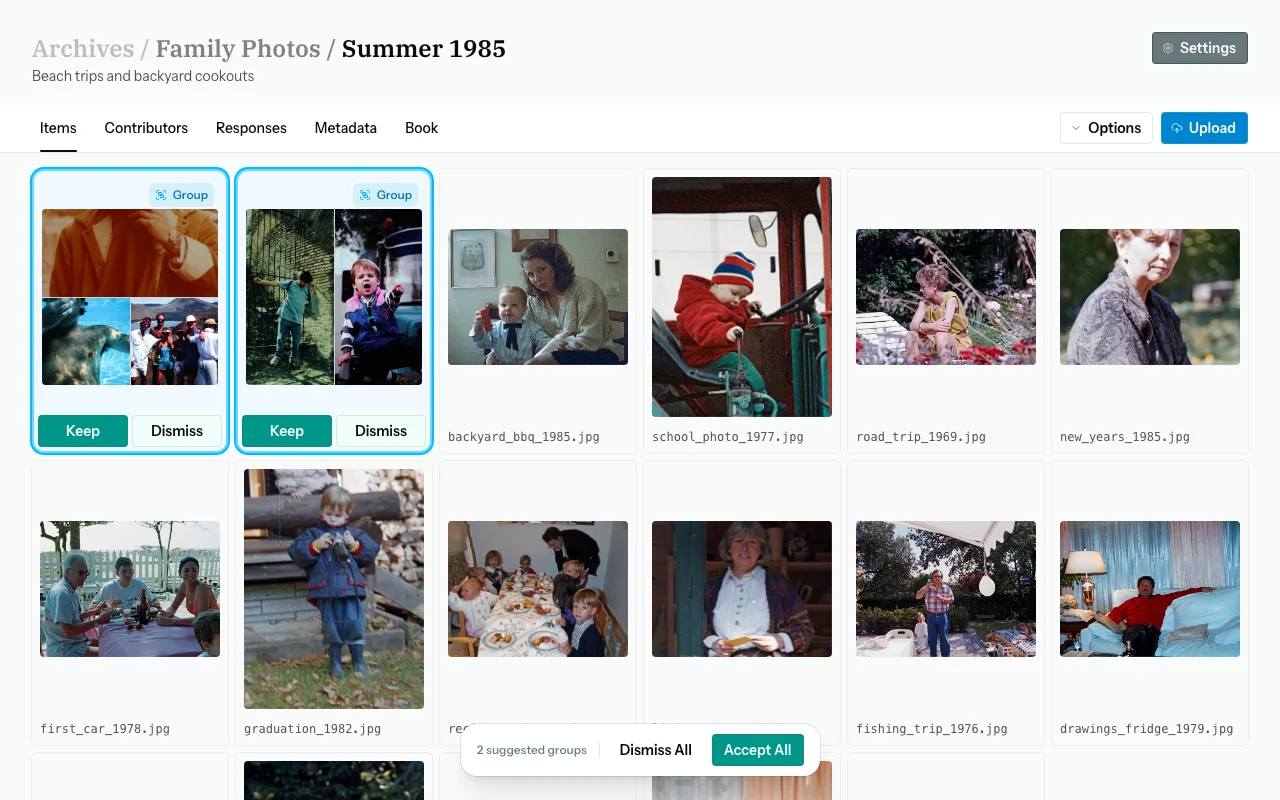
Similarity Engines
| Engine | Plans | Notes |
|---|---|---|
| pHash (perceptual hash) | All plans | Fast; excellent for near-duplicates and scanned duplicate prints |
| AI Embeddings (Vertex AI) | Medium, Large | More capable; finds conceptually and visually similar photos even when composition differs. Items analyzed with this engine show a purple AI badge. |
Entity Normalization
Consolidate variant names (e.g., "Bob," "Uncle Bob," "Robert Johnson") into one canonical form across your batch.
Getting Suggestions
From the Metadata tab, open Options → Normalize Data → "Get suggestions". Zeuge analyzes all extracted names, tags, and locations across all responses and proposes fuzzy-matched groups.
Reviewing & Merging
The Normalization Modal shows suggestion cards. For each:
- Merge — accept the suggested canonical
- Customize — type your own canonical before merging
- Skip — ignore this suggestion (e.g., false positive grouping)
Book Tab
The Book tab lets you compose a PDF photo book from your batch items and curated metadata, then export it as a downloadable PDF.
How It Works
- Open the Book tab on your batch detail page.
- The book editor opens with a filmstrip of all your items at the bottom and a preview area in the center.
- Configure the book layout and settings using the config panel on the right.
- Click "Export Book" when you're ready — the PDF is generated in the background.
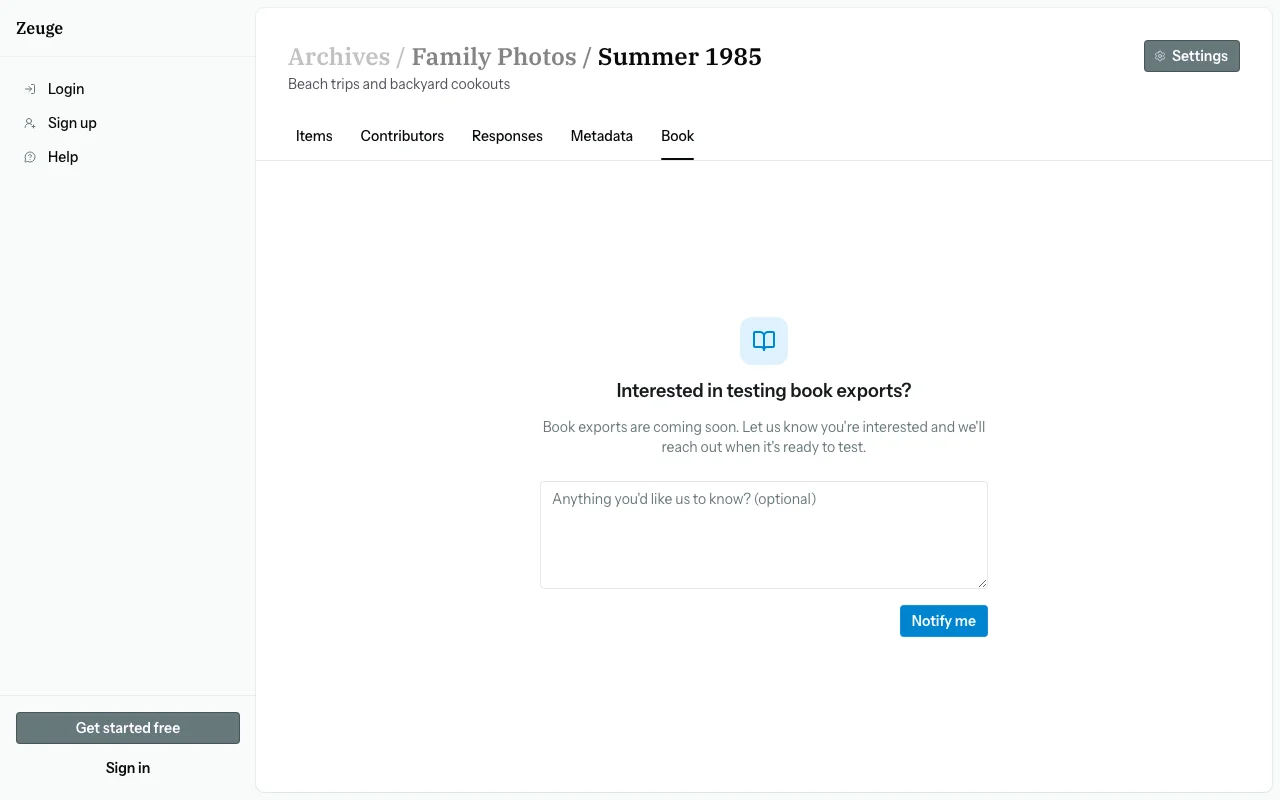
Layout Options
Choose how many photos appear per page: Single, Two-up, Three-up, Quad, or Inventory (full metadata listing page).
Cover Page
Enable the cover page in the config panel. You can set a custom title and choose whether to show the archive name.
Export Limits by Plan
| Plan | Max Pages per Book |
|---|---|
| Free | 15 |
| Small | 75 |
| Medium | Unlimited |
| Large | Unlimited |


Batch Lifecycle & Status
Batches progress through four statuses:
Created → Invited → Active → Complete| Status | When | What Contributors See |
|---|---|---|
| Created | New batch, no contributors yet | — |
| Invited | First contributor added | Can access and contribute |
| Active | First response submitted | Can access and contribute |
| Complete | Archivist paused contributions | "This collection is closed" message |
Pausing & Resuming
- Pause: Click the pause button in the batch header → sets status to "Complete"
- Resume: Click the resume button → sets status back to "Active"
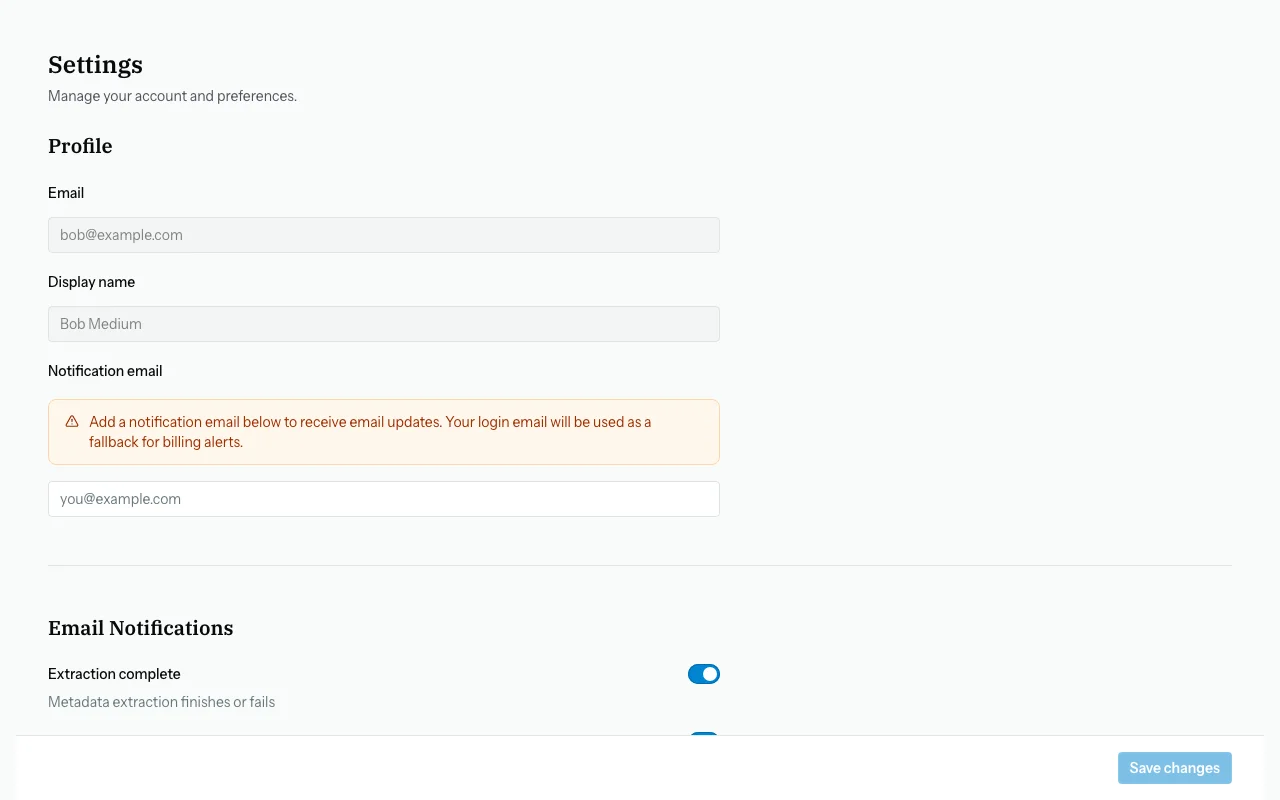
Settings Page
Access from the navigation: Settings (/settings).
Profile
- Display name
- Profile avatar
Account
- Account email (used to sign in)
- Notification email (for system alerts — can differ from auth email)
Subscription & Billing
- Current plan and its limits
- Upgrade / downgrade options
- Stripe billing portal (manage payment method, view invoices)
Sign Out
The Log out button is available at the bottom of the Settings page.
Subscription Tiers
| Feature | Free | Small | Medium | Large |
|---|---|---|---|---|
| Archives | 1 | 5 | 20 | Unlimited |
| Batches per archive | 5 | 25 | 100 | Unlimited |
| Items per batch | 50 | 300 | 1,000 | Unlimited |
| Contributors per batch | 2 | 10 | 50 | Unlimited |
| Book pages per export | 15 | 75 | Unlimited | Unlimited |
| Visual similarity (pHash) | ✅ | ✅ | ✅ | ✅ |
| AI similarity engine | ❌ | ❌ | ✅ | ✅ |
Upgrade your plan from the Settings page.